GDC Analysis Tool Software Development Kit (SDK)
This guide will detail the process of developing applications for the GDC Data Portal 2.0. It describes the structure of the GDC Data Portal, how to use the GDC Data Portal API, and how to develop applications for the GDC Data Portal.
The GDC Data Portal is a repository and computational platform for cancer researchers who need to understand cancer, its clinical progression, and response to therapy. The GDC Data Portal supports the development of applications that allow for analysis, visualization, and refinement of cohorts.
The GDC Data Portal is built on top of the GDC API, which provides access to the GDC data. The GDC Data Portal provides an Analysis Tool Framework (ATF) for developing applications that can be used to analyze, visualize, and download data from the GDC.
The GDC Data Portal is built with the React framework and the Redux library for state management. The GDC Data Portal uses NextJS as its application framework which provides server-side rendering of React components. Mantine.dev is the component library, and styling is through TailwindCSS. The GDC Data Portal is built on top of the GDC API, which provides access to the GDC data.

Architecture of the GDC Data Portal
Overview of an Application
Applications are React higher-order components (HOC) that are rendered in the Analysis Center. The GDC Data Portal's major functions such as Projects, Repository, and ProteinPaint are all applications. Each application handles a specific task such as analysis or visualization and can also be used to refine and build cohorts. Applications are cohort centric and can query the GDC API for additional information.
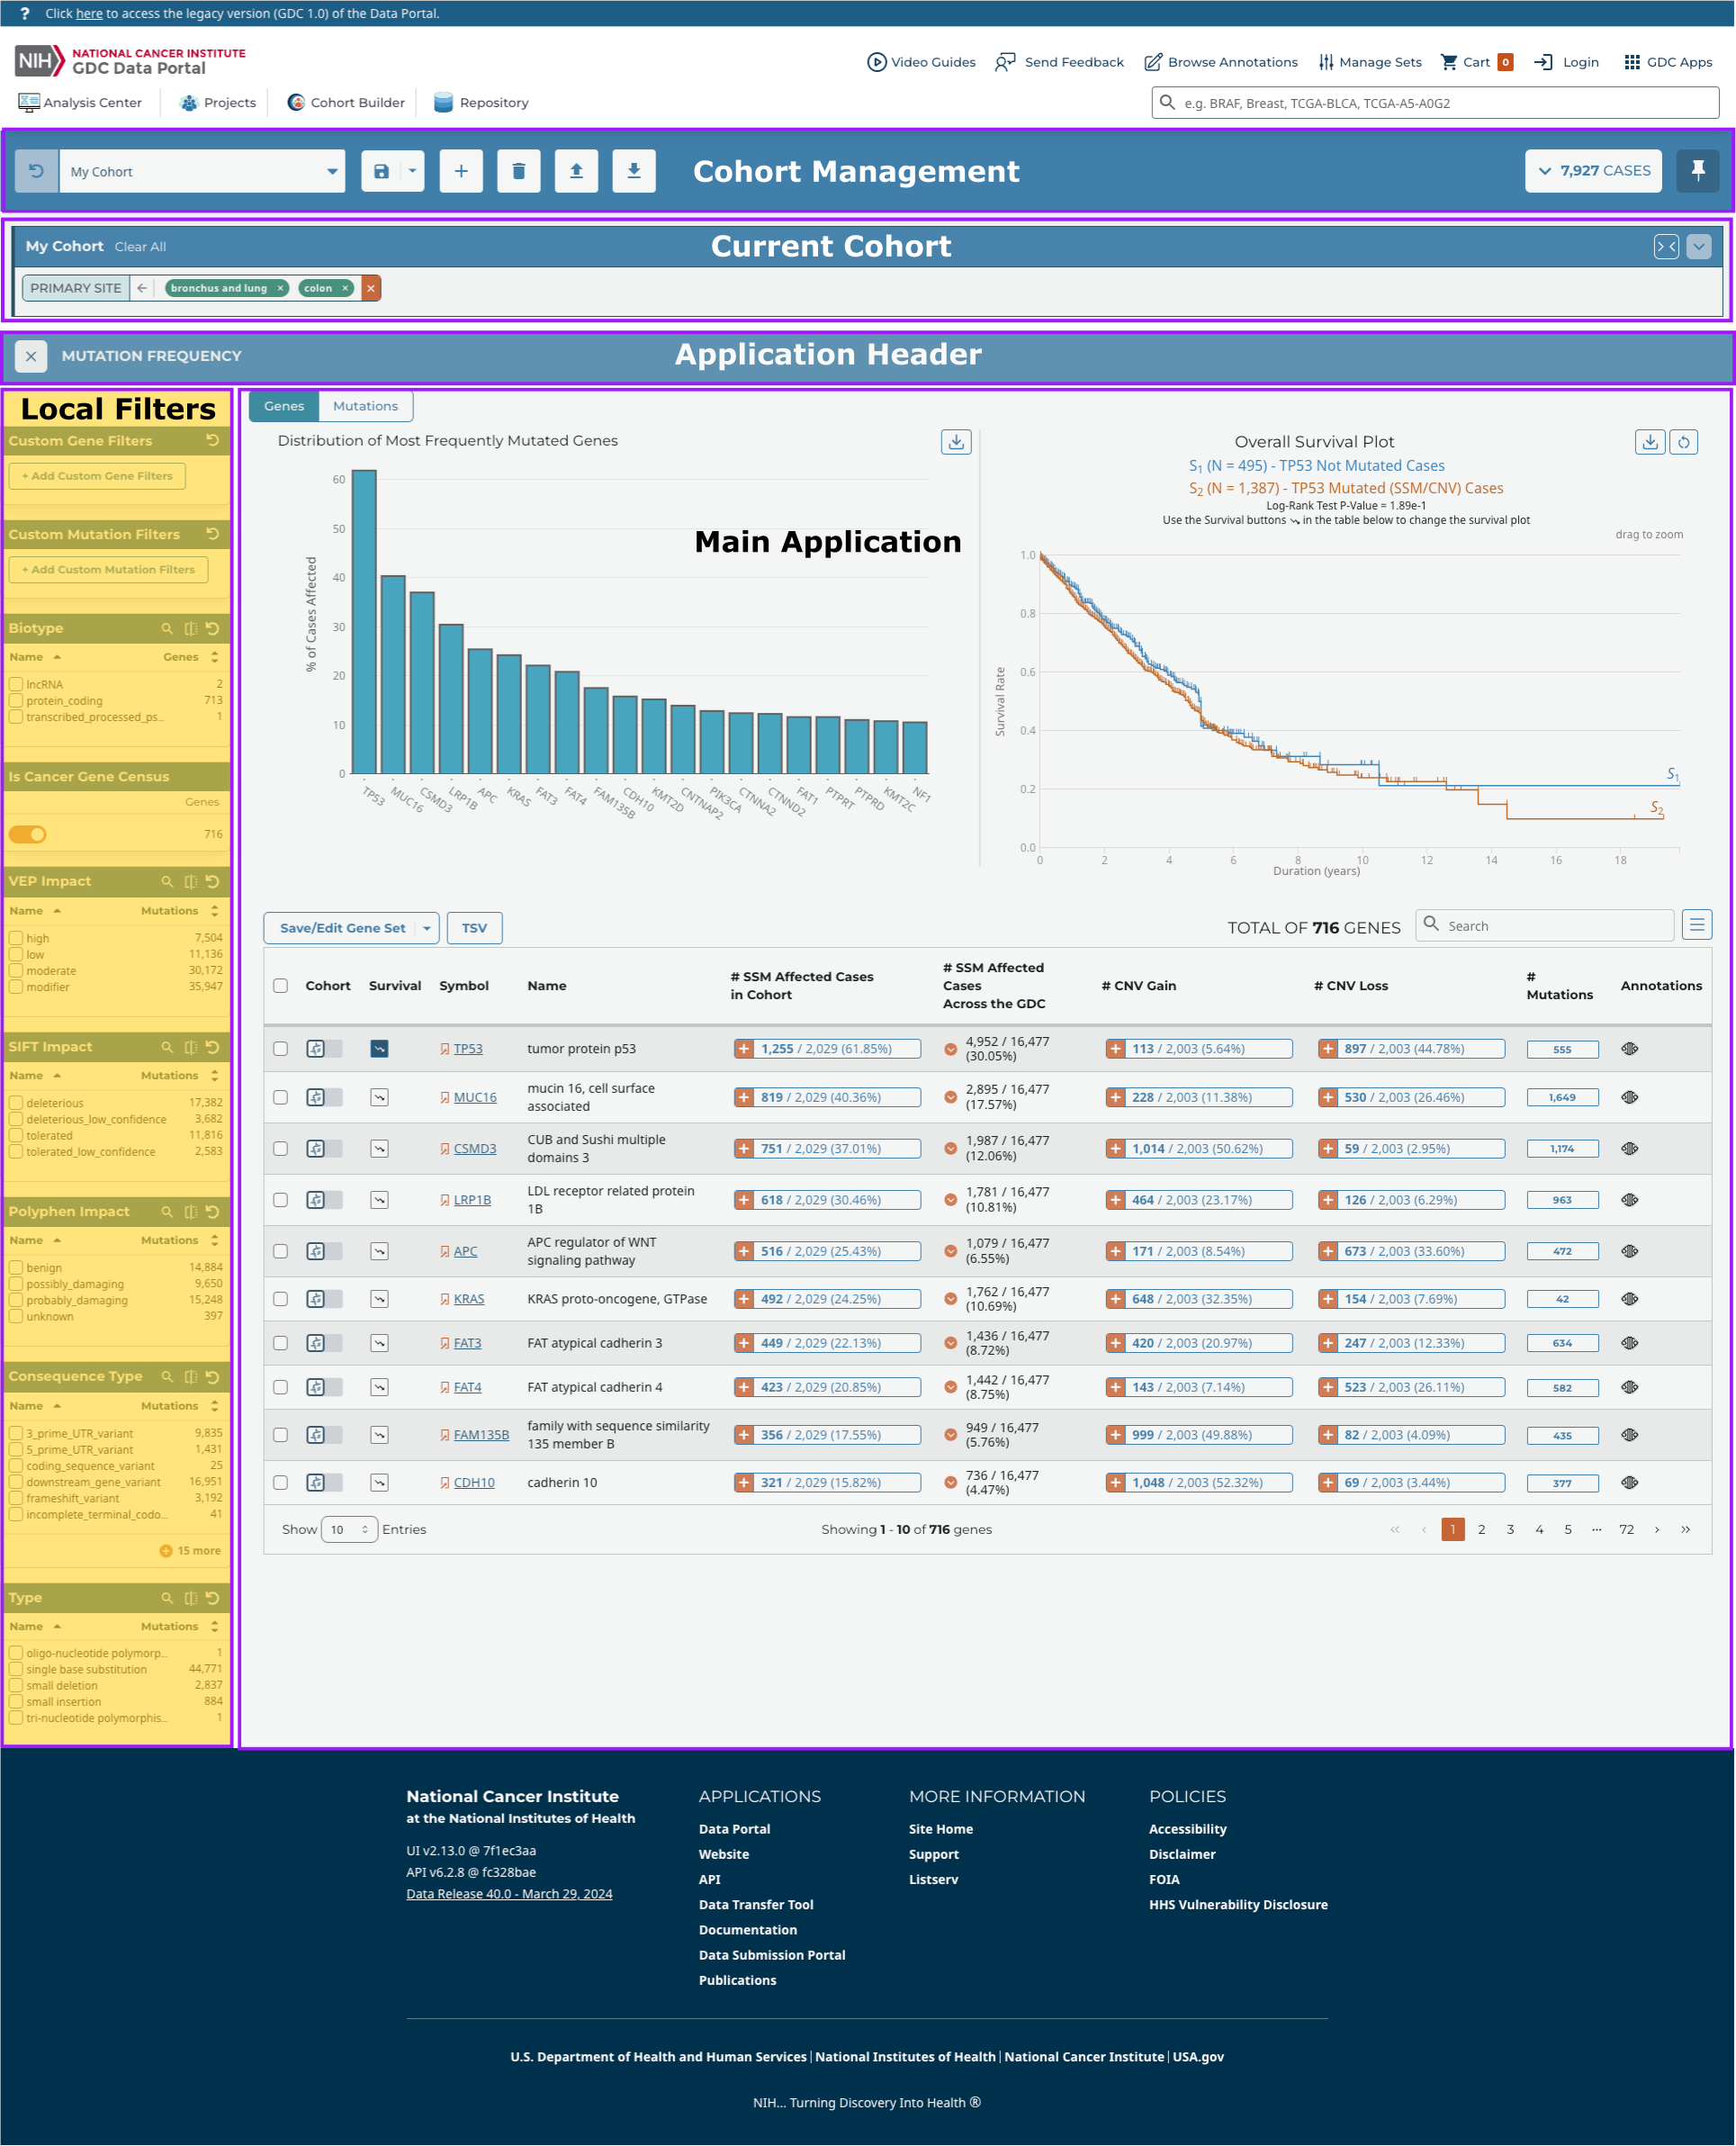
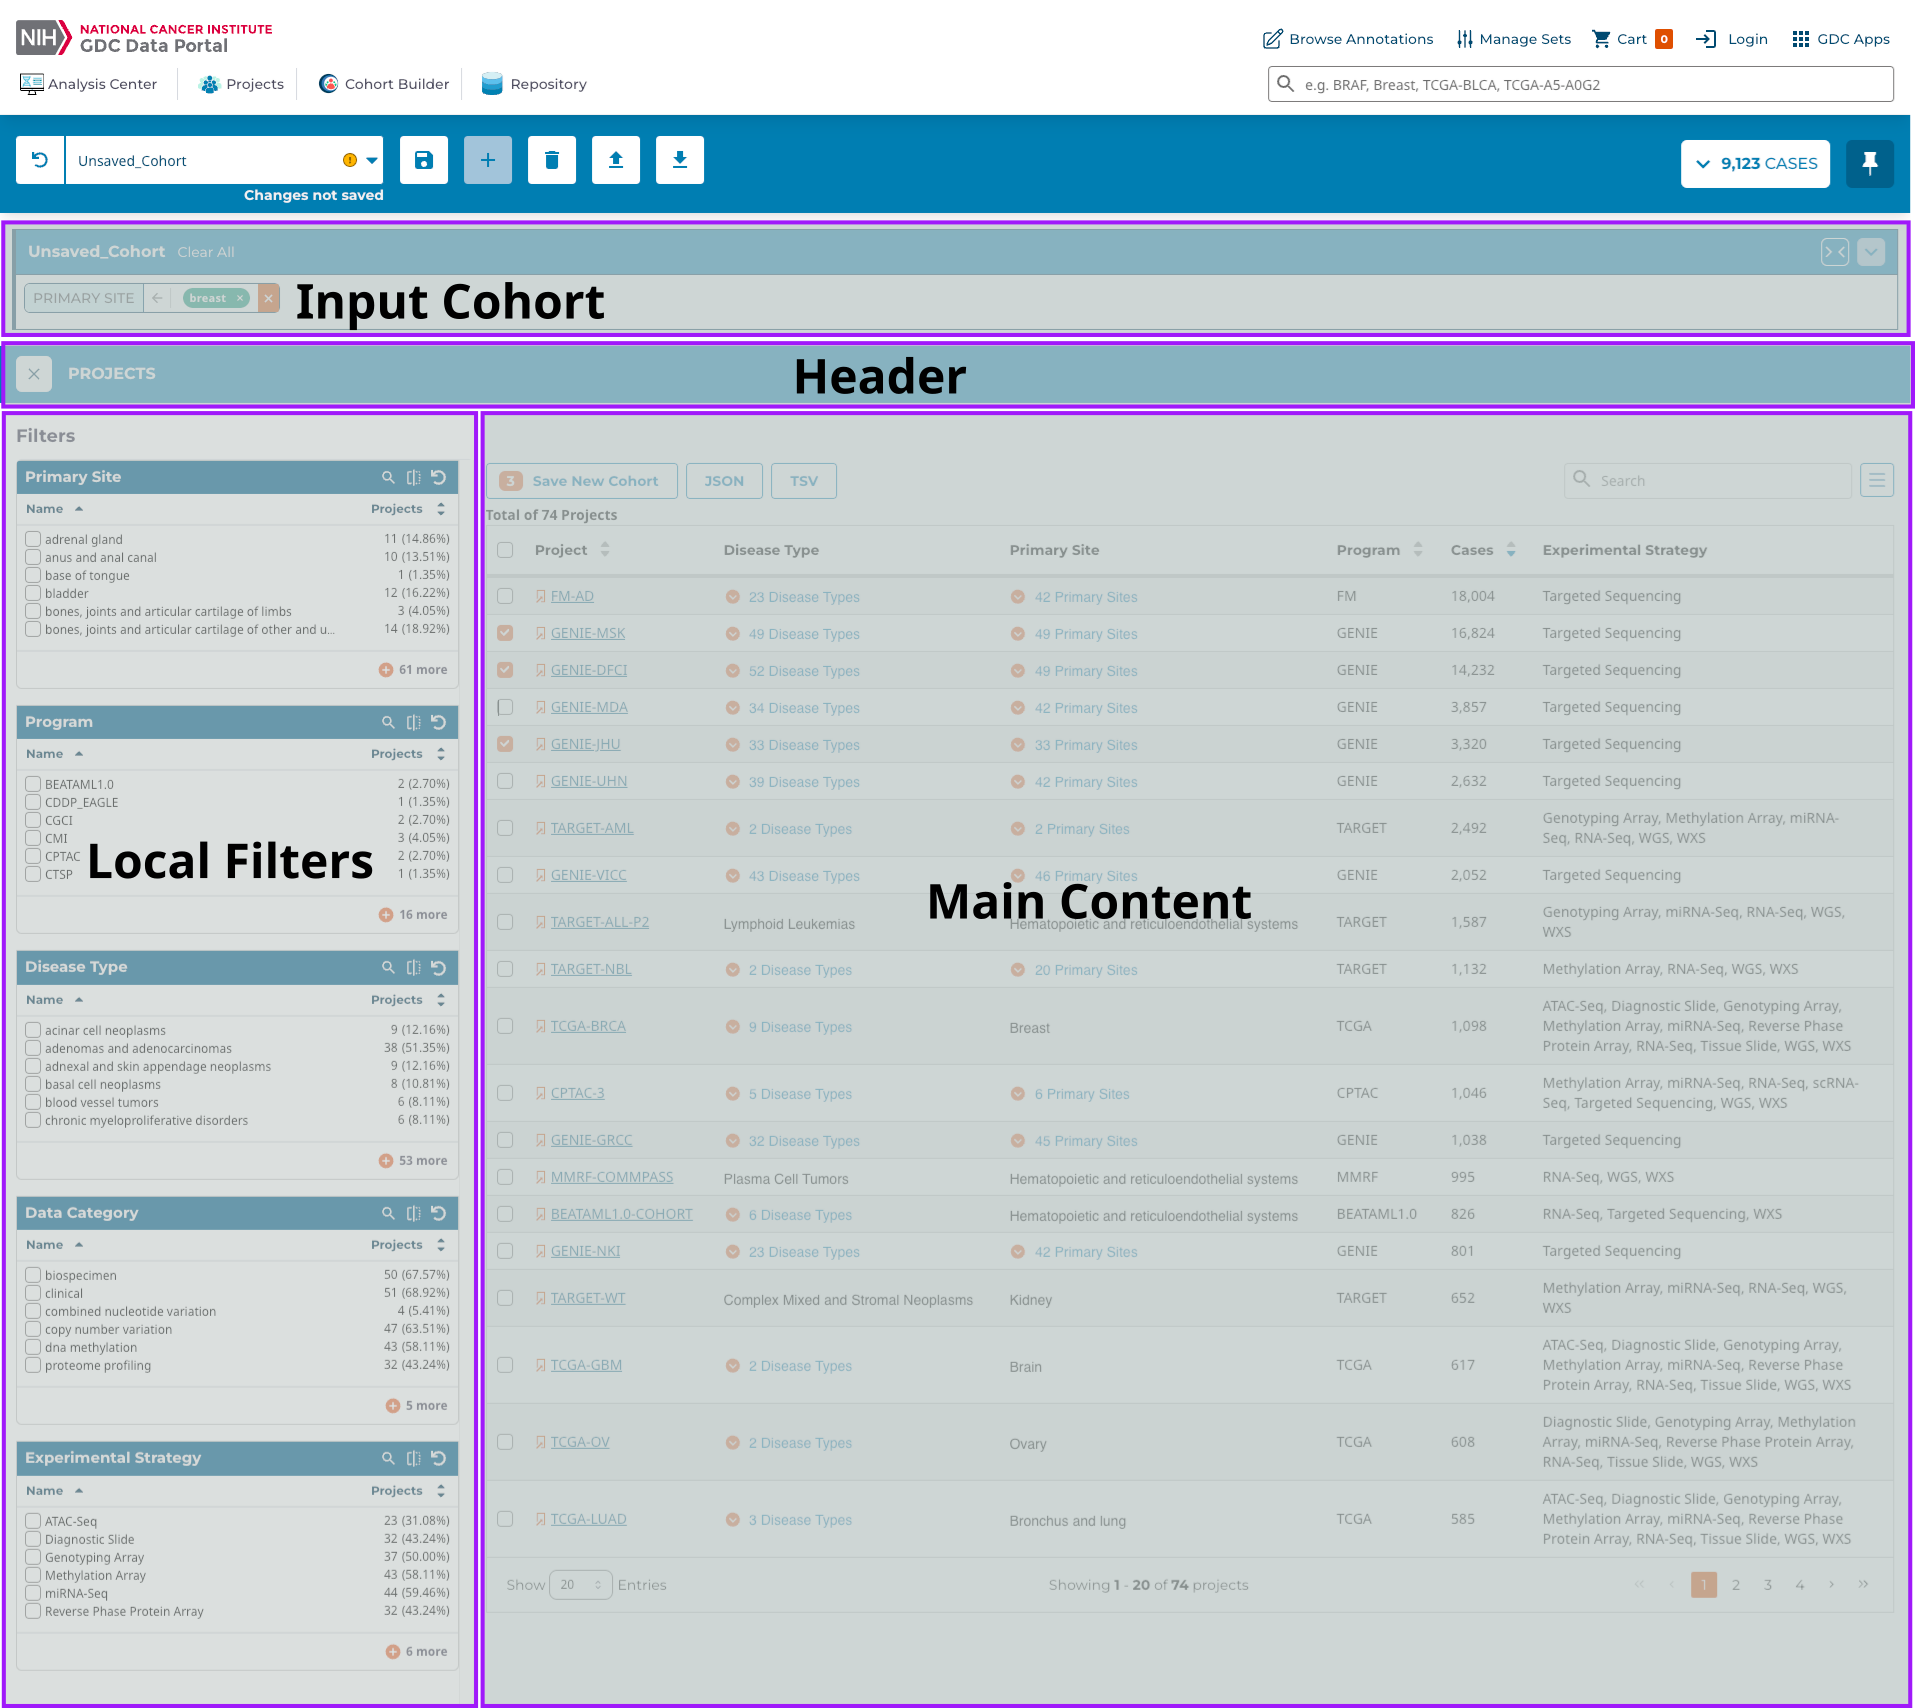
Local and Global filters are available to applications. Local filters are filters that are specific to the application and are used to refine the data that is displayed in the application.For example in the Mutation Frequency application, the local filters are the gene and mutation type filters. In the figure below the local filters are highlighted in yellow. These filters are used to refine the input cohort allowing users to drill down to specific genes and mutation types of interest in the cohort.
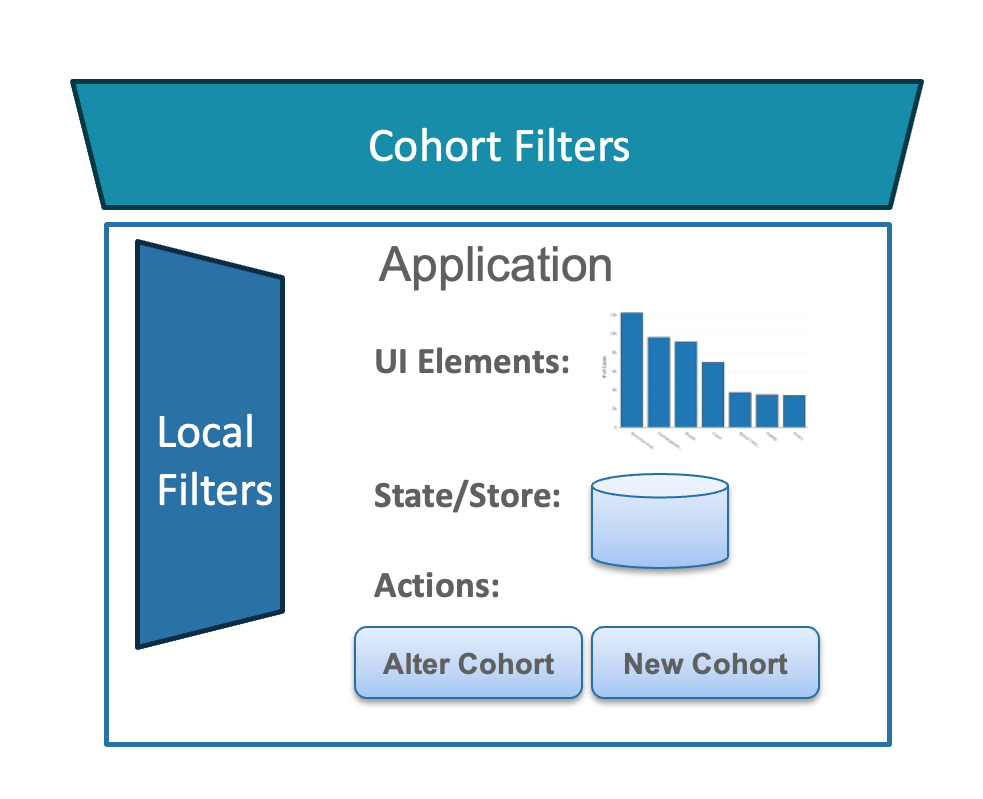
Local vs Global Filters
The GDC Data Portal application's input can be the current cohort or multiple user defined cohorts. The application then allow users to add filters refining the cohort, create new additional cohorts, or display the data in a visualization. Applications typically have:
- Local filters Refine the data displayed in the application
- Global filters Defines the cohort
- UI Components Display the data in the application
- State Stores the data displayed in the application
- Actions Update the state of the application
Applications can also create new cohorts. These cohorts can be used by other GDC Data Portal applications. The figure below illustrates the application components and cohort filters.
Cohorts and Filters
From an application perspective, a cohort is an Object containing the following information:
interface Cohort {
    id: string;        // unique id for cohort
    name: string;      // name of cohort
    filters: FilterSet; // active filters for cohort
    caseSet: CaseSetDataAndStatus; // case ids that are in the cohort
    modified?: boolean; // flag which is set to true is modified and unsaved
    modified_datetime: string; // last time cohort was modified
    saved?: boolean; // flag indicating if cohort has been saved.
    counts: CountsDataAndStatus; //case, file, etc. counts of a cohort
}
Likely the most important part of the cohort is the filters field. The filters field contains the active filters for
the cohort. The filters field is a FilterSet object. The FilterSet object contains the active filters for the
cohort. When calling either the GDC REST API or GDC GraphQL API the FilterSet is converted to the appropriate format
for the API. The FilterSet object is of the form:
interface FilterSet {
    op: "and" | "or"; // operator for combining filters
    root: Record<string, Operation>; // map of filter name to filter operation
}
Operation are GDC API filters as described in the GDC API. These are:
- Equals
- NotEquals
- LessThan
- LessThanOrEquals
- GreaterThan
- GreaterThanOrEquals
- Exists
- Missing
- Includes
- Excludes
- ExcludeIfAny
- Intersection
- Union
The root field is a map of filter names (as defined in the GDC API) to filter operation. The filter operation can be
either a single operation or a FilterSet object. The op field will eventually support either and or or, however
at this time only and is supported. The and operator is used to combine filters using the and operator. The or
operator is used to combine filters using the or operator. The FilterSet object is converted to the appropriate
format for the GDC API when the cohort is saved.
When using the GDC REpresentational State Transfer (REST) API, the FilterSet can be converted into the appropriate
format using the filterSetToOperation function. When using the GDC GraphQL API, the FilterSet can be using the
convertFilterSetToGraphQL function. The API guide will provide information on what format the filters should be in for the API. Also as the code is in TypeScript,
the IDE will provide information on the format as well.
Obtaining Cohort Information
The current active cohort can be accessed via the selector selectCurrentCohort. This selector returns the current
cohort, which is the cohort that is currently being displayed in the Cohort Management Bar. Accessing the current cohort
is done via the
selector:
import {useCoreSelector, selectCurrentCohort} from '@gff/core';

const currentCohort = useSelector(selectCurrentCohort);
By using the selector, the component/application will be updated when the cohort changes. There are also selectors for
getting a particular field from the cohort. For example, to get the cohort name, the selector selectCurrentCohortName
can be used. The selectors are:
selectCurrentCohortselectCurrentCohortNameselectCurrentCohortIdselectCurrentCohortFiltersselectCurrentCohortModifiedselectCurrentCohortModifiedDatetimeselectCurrentCohortSavedselectCurrentCohortCounts
The current active filters can be accessed via the selector selectCurrentCohortFilters. This selector returns the
current filters,
which are the filters that are currently being displayed in the Cohort Management Bar. Accessing the current filters is
done via the
selector:
import {useCoreSelector, selectCurrentFilters} from '@gff/core';

const currentFilters = useSelector(selectCurrentCohortFilters);
By using the selector, the application will be updated when the filters change. The filters are returned as
a FilterSet object described above.
All the cohorts can be selected using the selector selectAllCohorts. This selector returns all the cohorts in the
store. Accessing all the cohorts is done via the selector:
import {useCoreSelector, selectAllCohorts} from '@gff/core';

const allCohorts = useSelector(selectAllCohorts);
Using the GDC Data Portal Application API
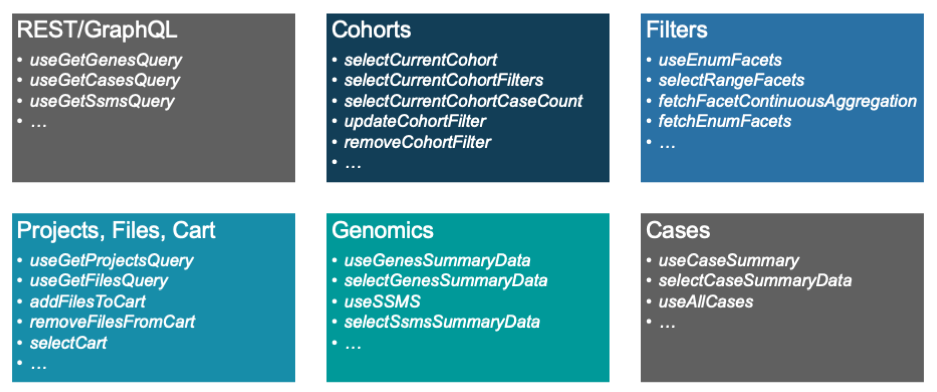
The GDC Data Portal provides a number of hooks for querying the GDC API. These hooks are located in the @gff/core package.
The hooks are designed to work in a manner similar to the RTL Query hooks. The hooks take arguments and return an
object.
The object contains the data and the status of the query. The status of the query is stored in the isSuccess variable.
The @gff/core package also provides a set of selectors that return values stored in the core redux store: CoreStore.
There are a number of hooks and selectors that are available for querying the GDC API, a subset of which are shown below:
Case Information
The GDC Data Portal provides several hooks for querying case information. These hooks are located in the @gff/core
package. Cases can be queried using several different methods. The useAllCases hook returns all the cases in the GDC
and can be filtered by the current cohort as shown below
import {useCoreSelector, useAllCases} from '@gff/core';

...

const [pageSize, setPageSize] = useState(10);
const [offset, setOffset] = useState(0);
const [searchTerm, setSearchTerm] = useState<string>("");
const [sortBy, setSortBy] = useState<SortBy[]>([]);
const cohortFilters = useCoreSelector((state) =>
    selectCurrentCohortFilters(state),
);


const {data, isFetching, isSuccess, isError, pagination} = useAllCases({
    fields: [
        "case_id",
        "submitter_id",
        "primary_site",
        "disease_type",
        "project.project_id",
        "project.program.name",
        "demographic.sex_at_birth",
        "demographic.race",
        "demographic.ethnicity",
        "demographic.days_to_death",
        "demographic.vital_status",
        "diagnoses.primary_diagnosis",
        "diagnoses.age_at_diagnosis",
        "summary.file_count",
        "summary.data_categories.data_category",
        "summary.data_categories.file_count",
        "summary.experimental_strategies.experimental_strategy",
        "summary.experimental_strategies.file_count",
        "files.file_id",
        "files.access",
        "files.acl",
        "files.file_name",
        "files.file_size",
        "files.state",
        "files.data_type",
    ],
    size: pageSize,
    filters: cohortFilters,
    from: offset * pageSize,
    sortBy: sortBy,
    searchTerm,
});
The useAllCases hook takes a number of arguments:
fields- The fields to return from the GDC APIsize- The number of cases to returnfilters- The filters to apply to the casesfrom- The starting index of the cases to returnsortBy- The fields to sort the cases bysearchTerm- The search term to use to search the cases
This call is used in the Table view tab of the Cohort Management Bar.
Information for a single case can be queried using the useCaseSummary hook. This call is used in the caseView page:
portal.gdc.cancer.gov/cases/5693302a-4548-4c0b-8725-0cb7c67bc4f8
  const {data, isFetching} = useCaseSummary({
    filters: {
        content: {
            field: "case_id",
            value: case_id,
        },
        op: "=",
    },
    fields: [
        "files.access",
        "files.acl",
        "files.data_type",
        "files.file_name",
        "files.file_size",
        "files.file_id",
        "files.data_format",
        "files.state",
        "files.created_datetime",
        "files.updated_datetime",
        "files.submitter_id",
        "files.data_category",
        "files.type",
        "files.md5sum",
        "case_id",
        "submitter_id",
        "project.name",
        "disease_type",
        "project.project_id",
        "primary_site",
        "project.program.name",
        "summary.file_count",
        "summary.data_categories.file_count",
        "summary.data_categories.data_category",
        "summary.experimental_strategies.experimental_strategy",
        "summary.experimental_strategies.file_count",
        "demographic.ethnicity",
        "demographic.demographic_id",
        "demographic.sex_at_birth",
        "demographic.race",
        "demographic.submitter_id",
        "demographic.days_to_birth",
        "demographic.days_to_death",
        "demographic.vital_status",
        "diagnoses.submitter_id",
        "diagnoses.diagnosis_id",
        "diagnoses.classification_of_tumor",
        "diagnoses.age_at_diagnosis",
        "diagnoses.days_to_last_follow_up",
        "diagnoses.days_to_last_known_disease_status",
        "diagnoses.days_to_recurrence",
        "diagnoses.last_known_disease_status"]
});
The useCaseSummary hook takes a number of arguments:
fields- The fields to return from the GDC APIfilters- The filters to apply to the cases and where the caseId is passed in
File Information
Similar to the case information, the GDC Data Portal provides a number of hooks for querying file information. These hooks
are located in the @gff/core package.
To get a list of files associated with a cohort, the useGetFilesQuery hook can be used. This call is used in the
Repository application which is used to display the files associated with a cohort.
The useGetFilesQuery hook takes a number of arguments:
import {
    useCoreDispatch,
    useCoreSelector,
    selectCurrentCohortFilters,
    buildCohortGqlOperator,
    joinFilters,
    useFilesSize,
} from "@gff/core";

...

const coreDispatch = useCoreDispatch();
const [sortBy, setSortBy] = useState<SortBy[]>([]); // states to handle table sorting and pagination
const [pageSize, setPageSize] = useState(20);
const [offset, setOffset] = useState(0);

const repositoryFilters = useAppSelector((state) => selectFilters(state)); // as this is a app get the repository filters from the app state (local filters)
const cohortFilters = useCoreSelector((state) =>    // get the cohort filters from the core state (global filters)
    selectCurrentCohortFilters(state),
);

const {data, isFetching, isError, isSuccess} = useGetFilesQuery({
    case_filters: buildCohortGqlOperator(cohortFilters),
    filters: buildCohortGqlOperator(repositoryFilters),
    expand: [
        "annotations", //annotations
        "cases.project", //project_id
        "cases",
    ],
    size: pageSize,
    from: offset * pageSize,
    sortBy: sortBy,
});
The useGetFilesQuery hook takes a number of arguments:
case_filters- The filters to apply to the casesfilters- The filters to apply to the filesexpand- The fields to expandsize- The number of files to returnfrom- The starting index of the files to returnsortBy- The fields to sort the files by
Note this hook was designed to take global filters (e.g. the current cohort as case_filters) and local filters (the
Repository filters).
Information for a single file can be queried using the useFileSummary hook. This call is used in
the File Summary View
page portal.gdc.cancer.gov/files/9b8960e1-619a-4477-8dff-54124716bcd9
 const {data: {files} = {}, isFetching} = useGetFilesQuery({
    filters: {
        op: "=",
        content: {
            field: "file_id",
            value: setCurrentFile,
        },
    },
    expand: [
        "cases",
        "cases.annotations",
        "cases.project",
        "cases.samples",
        "cases.samples.portions",
        "cases.samples.portions.analytes",
        "cases.samples.portions.slides",
        "cases.samples.portions.analytes.aliquots",
        "associated_entities",
        "analysis",
        "analysis.input_files",
        "analysis.metadata.read_groups",
        "downstream_analyses",
        "downstream_analyses.output_files",
        "index_files",
    ],
});
The useFileSummary hook takes several arguments:
filters- The filters to apply to the cases and where the file uuid is passed inexpand- The fields to expand
Sets: Gene, SSMS, and Case
Sets are supported by the GDC API and are used to create an entity that represents a set of items as a set_id. Sets
are either gene sets, SSM sets, or case sets. All of the GDC APIs support passing sets as a filter parameter.
The GDC Data Portal provides a number of hooks for creating and querying set information.
A set can be created using one of the following hooks:
useCreateGeneSetFromValuesMutationuseCreateSsmsSetFromValuesMutationuseCreateCaseSetFromValuesMutationuseCreateGeneSetFromFiltersMutationuseCreateSsmsSetFromFiltersMutationuseCreateCaseSetFromFiltersMutation
These functions will create a set from either a list of values or a filter set. The useCreate...SetFromValuesMutation
hooks take a single parameter values which is an array of values, while the useCreate...SetFromFiltersMutation
hooks take one required parameter filters
that is either a filter set or JSON object. Both calls return the created set_id if the set was successfully created.
As the above hooks are Redux Toolkit Query hooks, namely mutation hooks, they return a tuple of the form:
[mutationHook, response] which is a function to call the mutation and the response from the mutation. The mutation
hook can be used like:
 const [createSet, response] = createSetHook();

const handleCreateSet = async () => {
    const {data} = await createSet({
        variables: {
            values: ["TP53", "KRAS", "EGFR"],
        },
    });
    if (response.isSuccess) {
        dispatch(
            addSet({
                setType,
                setName: form.values.name.trim(),
                setId: response.data as string,
            }),
        );
    }
    ;
}
Once a set is created it can be altered using the following hooks:
useAppendToGeneSetMutationuseAppendToSsmSetMutationuseRemoveFromGeneSetMutationuseRemoveFromSsmSetMutation
Sets can be managed using the following actions:
addSetremoveSetupdateSet
The following selectors are available for getting set information:
selectAllSetsselectSetByIdselectSetByNameselectSetByType
Finally, the following hooks are available for querying set size:
useGeneSetCountsQueryuseSsmSetCountsQueryuseCaseSetCountsQuery
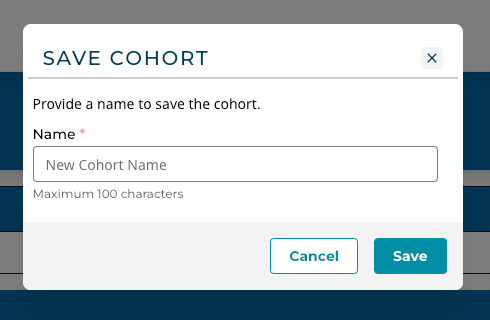
Creating a Cohort
Depending on the application function, it may be beneficial to create a new cohort. Although the GDC Data Portal SDK provides a
number of functions for creating a new cohort, it is highly recommended that the application use the provided Button and
SaveCohortModal components to create a new cohort. The Button and SaveCohortModal components are located in
the @gff/portal-proto package.
To create a cohort using the SaveCohortModal component the following code can be used: In summary, the above code flow is:
- The
ProjectsCohortButtoncomponent renders a button with the label "Save New Cohort" - When the button is clicked, it sets the state variable
showSaveCohortto true, which triggers the rendering of theSaveCohortModalcomponent. - The
SaveCohortModalcomponent passed: - An onClose function that sets the showSaveCohort state variable to false.
- A
filtersprop, which is an object defining the filters for the cohort based on the selected projects. - The
SaveCohortModalwill use the passed filter to create, name, and save the cohort when the save button is clicked.
Additional details on the SaveCohortModal component can be found in the Component Library
section.
Altering a Cohort
Altering a cohort is done by dispatching actions to add, remove, or clear filters. The following actions are available for altering the current cohort:
updateCohortFilterremoveCohortFilterclearCohortFilters
Note that all of these operations are applied to the current cohort. The current cohort is the cohort that is currently
being displayed in the Cohort Management Bar. The current cohort can be programmatically accessed via the selectCurrentCohort selector.
The current cohort's filters can be accessed via the selectCurrentCohortFilters selector.
Updating, Removing, and Clearing filters
To update the current selected cohort's filter, the updateCohortFilter action can be used. The updateCohortFilter
action takes two arguments:
interface UpdateFilterParams {
    field: string;
    operation: Operation;
}
where field is the field to update and operation is the operation to apply to the field. For example to update the
cases.project.project_id field to include the project TCGA-ACC the following code can be used:
import {useCoreDispatch, updateCohortFilter} from '@gff/core';

const coreDispatch = useCoreDispatch();

coreDispatch(updateCohortFilter({
    field: "cases.project.project_id",
    operation: {
        op: "in",
        content: {
            field: "cases.project.project_id",
            value: ["TCGA-ACC"],
        },
    },
}));
This will update the current cohort's filter to include the project TCGA-ACC. The removeCohortFilter action can be
used to remove a filter from the current cohort. The removeCohortFilter action takes a single argument:
interface RemoveFilterParams {
    field: string;
}
where field is the field to remove. For example, to remove the cases.project.project_id field from the current
cohort's filter, the following code can be used:
import {useCoreDispatch, removeCohortFilter} from '@gff/core';

const coreDispatch = useCoreDispatch();

coreDispatch(removeCohortFilter({
    field: "cases.project.project_id",
}));
This will remove the cases.project.project_id field from the current cohort's filter. The clearCohortFilters action
can be used to clear all the filters from the current cohort. The clearCohortFilters action takes no arguments. For
example, to clear all the filters from the current cohort, the following code can be used:
import {useCoreDispatch, clearCohortFilters} from '@gff/core';

const coreDispatch = useCoreDispatch();

coreDispatch(clearCohortFilters());
This will clear all the filters from the current cohort.
Updating the Cohort Name
The cohort name can be updated using the updateCohortName action. The updateCohortName action takes a single
argument:
interface UpdateCohortNameParams {
    name: string;
}
where name is the new name for the cohort. For example, to update the current cohort's name to My Cohort, the
following code can be used:
import {useCoreDispatch, updateCohortName} from '@gff/core';

const coreDispatch = useCoreDispatch();

coreDispatch(updateCohortName({
    name: "My Cohort",
}));
This will update the current cohort's name to My Cohort.
Setting the Current Cohort
The current cohort can be set using the setCurrentCohort action. The setCurrentCohort action takes a single
argument:
interface SetCurrentCohortParams {
    cohortId: string;
}
where cohortId is the id of the cohort to set as the current cohort. For example, to set the cohort with id 1234 as
the current cohort, the following code can be used:
import {useCoreDispatch, setCurrentCohort} from '@gff/core';

const coreDispatch = useCoreDispatch();

coreDispatch(setCurrentCohort({
    cohortId: "1234",
}));
This will set the cohort with ID 1234 as the current cohort.
Total Count Information
Count information can be queried using the useTotalCounts hook. This hook takes a number of arguments:
import {useTotalCounts} from "@gff/core";

const {data, isFetching, isSuccess, isError} = useTotalCounts();
This will return the total counts for the GDC. The data in the response is of the form:
interface TotalCounts {
    counts: {
        caseCounts: number;
        fileCounts: number;
        genesCounts: number;
        mutationCounts: number;
        repositoryCaseCounts: number;
        projectsCounts: number;
        primarySiteCounts: number;
    },
    status: DataStatus;
}
where DataStatus is defined as:
export type DataStatus = "uninitialized" | "pending" | "fulfilled" | "rejected";
Application Card Counts
The application cards show the counts for the data required by them. The data types below are supported:
- caseCount
- fileCount
- genesCount
- mutationCount
- ssmCaseCount
- sequenceReadCaseCount
- geneExpressionCaseCount
- mafFileCount
Each of these use a specific GraphQL query to the GDC Data API to get the count. If an application requires a specialized count, then the developer will need to implement and register a count function that returns the following:
[
    {
        data: number,                // The count for the specific data type
        isFetching: boolean,         // True if the query is fetching data
        isSuccess: boolean,          // True if query sucessfully completes
        isError: boolean             // True if the query has encountered an error
    }
]
useLazyQuery.
For example:
import { graphqlAPISlice } from "../../gdcapi/gdcgraphql";
import { buildCohortGqlOperator, FilterSet, joinFilters } from "../../cohort";

const graphQLQuery = `
  query ssmsCaseCountQuery($ssmCaseFilter: FiltersArgument) {
  viewer {
    repository {
      ssmsCases : cases {
        hits(case_filters: $ssmCaseFilter, first: 0) {
          total
        }
      }
    }
  }
}`;

/**
 * Injects endpoints for case counts for ssmsCounts
 */
const ssmsCaseCountSlice = graphqlAPISlice.injectEndpoints({
  endpoints: (builder) => ({
    ssmsCaseCount: builder.query<number, FilterSet>({
      query: (cohortFilters) => {
        const graphQLFilters = {
          ssmCaseFilter: buildCohortGqlOperator(
            joinFilters(cohortFilters ?? { mode: "and", root: {} }, {
              mode: "and",
              root: {
                "cases.available_variation_data": {
                  operator: "includes",
                  field: "cases.available_variation_data",
                  operands: ["ssm"],
                },
              },
            }),
          ),
        };
        return {
          graphQLFilters,
          graphQLQuery,
        };
      },
      transformResponse: (response) =>
        response?.data?.viewer?.repository?.ssmsCases?.hits?.total ?? 0,
    }),
  }),
});

export const { useLazySsmsCaseCountQuery } = ssmsCaseCountSlice;
This function then needs to be registered by adding the call:
import { CountHookRegistry}  from "@gff/core";

...

CountHookRegistry.getInstance().registerHook("ssmCaseCount", useLazySsmsCaseCountQuery);
The count function is now registered with it name passed as the first argument to registerHook , and is used to set the value of the countsField in the
application registration described below. An appropriate place to add the registration call is in _app.tsx.
Component Library
The GDC Data Portal provides a number of components that make it easy to develop applications
for it. These components are located in the @gff/portal-proto
package.
In several components, the GDC Data Portal uses the Mantine component library but base components and
encapsulates calls to the GDC API so that developers do not have to.
Buttons
The GDC Data Portal provides a number of buttons that can be used for various purposes. These buttons are located in
the @gff/portal-proto package.
The buttons are:
DownloadButton- A button that can be used to download data from the GDC API.SaveCohortButton- A button that can be used to save a cohort.
The DownloadButton component is used in the Repository application to download data from the GDC API.
The DownloadButton component takes a number of arguments:
<DownloadButton
    inactiveText={`Download ${numFilesCanAccess} Authorized File${
        numFilesCanAccess !== 1 ? "s" : ""
    }`}
    activeText=""
    disabled={
        numFilesCanAccess === 0 ||
        (user.username && dbGapList.length > 0 && !checked)
    }
    endpoint="data"
    extraParams={{
        ids: (filesByCanAccess?.true || []).map((file) => file.file_id),
        annotations: true,
        related_files: true,
    }}
    method="POST"
    setActive={setActive}
/>
The parameters for the DownloadButton are defined in the GDC Data Portal 2.0 SDK API documentation. The DownloadButton
component will take care of
calling the GDC API and downloading the data. The DownloadButton component will also provide status that can be used
with
a progress bar or spinner to display the progress of the download.
The SaveCohortButton component is used in the Repository application to save a cohort.
The SaveCohortButton component takes a number of arguments:
<CohortCreationButton
    numCases={cohort1Count}
    label={cohort1Count.toLocaleString()}
    filtersCallback={async () =>
        generateFilters(caseSetIds[0], caseSetIds[1])
    }
/>
The CohortCreationButton component will show the number of selected cases and will create a new saved cohort
when the button is clicked. The filtersCallback is a function that returns the filters for the cohort.
Modals
Modals are used to show transitory information or obtain information from the user. The GDC Data Portal provides many
modals that can be used for various purposes. One such modal is the SaveCohortModal component mentioned previously.
SaveCohortModal- A modal that can be used to save a cohort.- Various modals for displaying information on Sets:
CaseSetModalGeneSetModalMutationSetModalSaveOrCreateEntityModal- A modal that can be used to save or create a new entity.
These modals and others, are documented in the Portal 2.0 SDK API documentation.
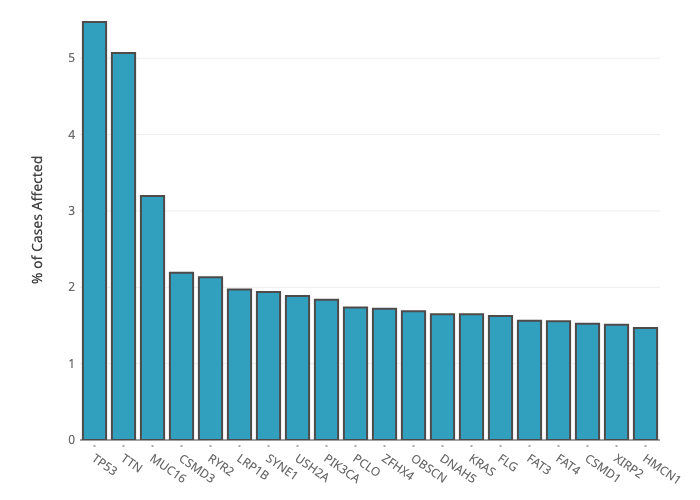
Charts
Basic charts are provided for use within an application, although developers are free to use any desired charting library compatible with React 18. The charts provided are:
BarChart- A bar chart
The BarChart component (based on Plotly) is passed data in the form:
import {PlotData} from "plotly.js";


export interface BarChartData {
    datasets: Partial<PlotData>[];
    yAxisTitle?: string;
    tickvals?: number[];
    ticktext?: string[];
    label_text?: string[] | number[];
    title?: string;
    filename?: string;
}
Where datasets is an array of PlotData objects, which at the minimum contain the x and y fields.
The yAxisTitle is the title for the y-axis, the tickvals and ticktext are the tick values and text for
the x-axis, the label_text is the text for the labels, the title is the title for the chart,
and the filename is the filename to use when downloading the chart.
Note that BarChart needs to be imported as a dynamic component:
import dynamic from "next/dynamic";

const BarChart = dynamic(() => import("@/components/charts/BarChart"), {
    ssr: false,
});
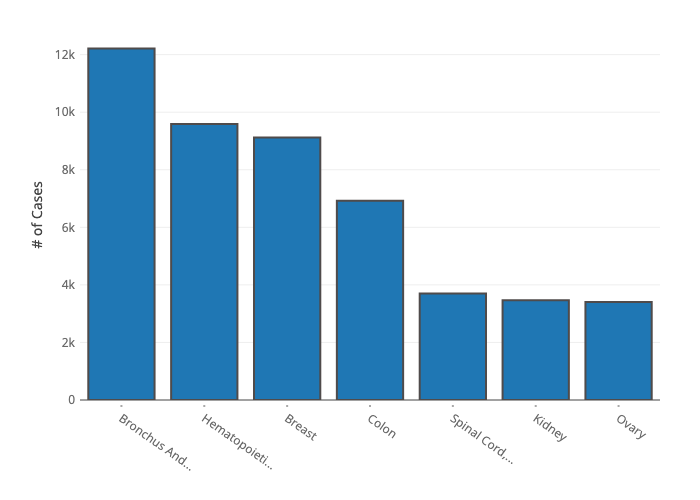
Cancer Distribution- A cancer distribution chart
The CancerDistribution component (based on Plotly) is different as it passed the Gene Symbol
and optionally cohort and gene filters.
interface CNVPlotProps {
    readonly gene: string;
    readonly height?: number;
    readonly genomicFilters?: FilterSet;
    readonly cohortFilters?: FilterSet;
}
These charts and others are documented in the GDC Data Portal 2.0 SDK API documentation.
Facets
Facet components are provided for use in building local filters for an application. There are several types of facet components:
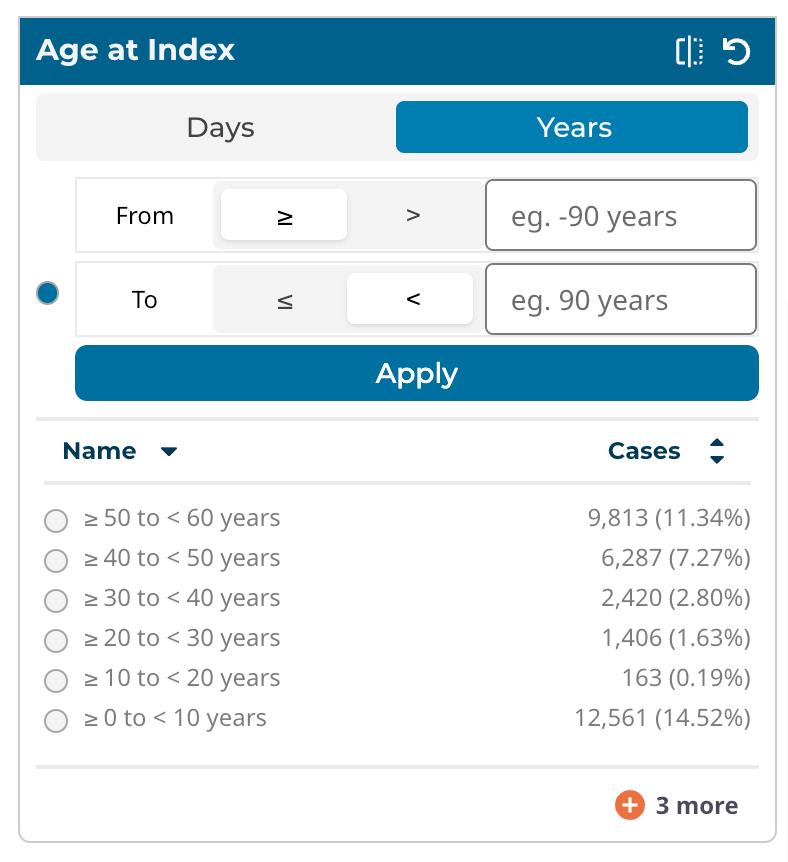
EnumFacet- A facet that is used to filter on an enum fieldDateFacet- A facet that is used to filter a date fieldNumericRangeFacet- A facet that is used to filter on a range fieldPercentileFacet- A facet that is used to filter on a percentile fieldAgeRangeFacet- A facet that is used to filter on an age range fieldTextFacet- A facet that is used to filter a text fieldBooleanFacet- A facet that is used to filter on a boolean field
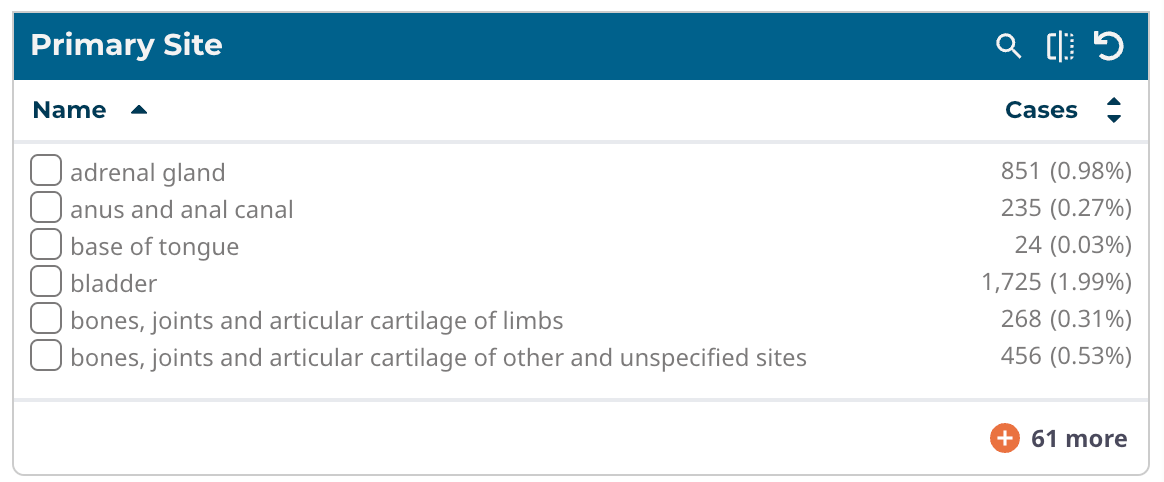
Enum Facet
Range Facet
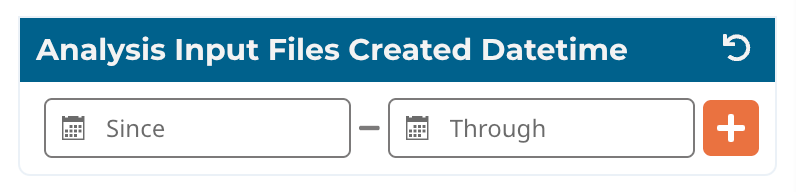
Date Range Facet
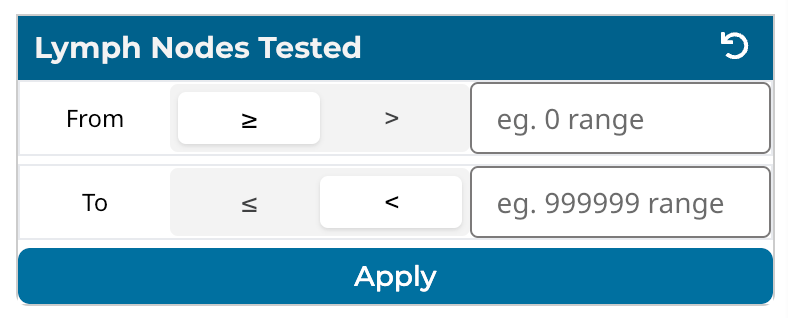
Number Range Facet
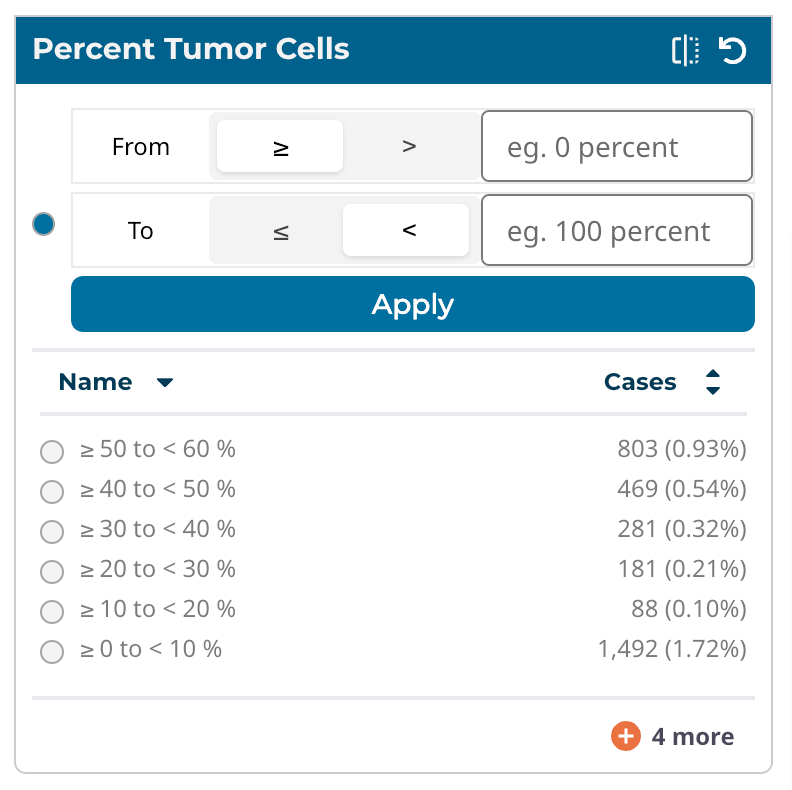
Percentile Facet
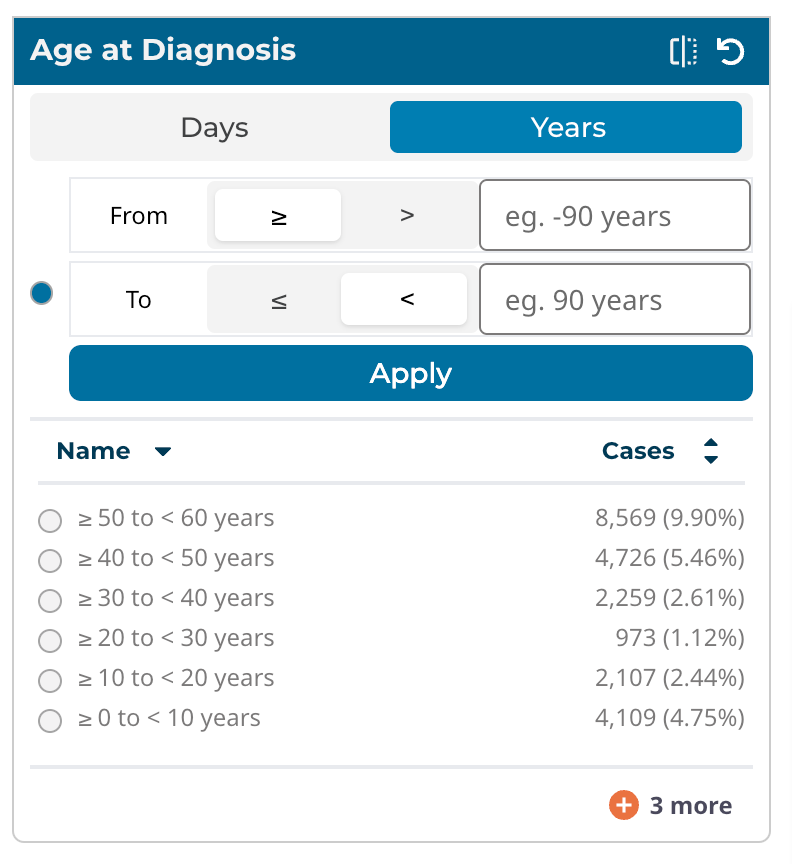
Age Range Facet
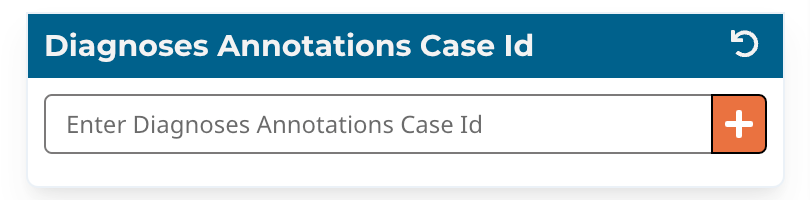
Exact Value Facet
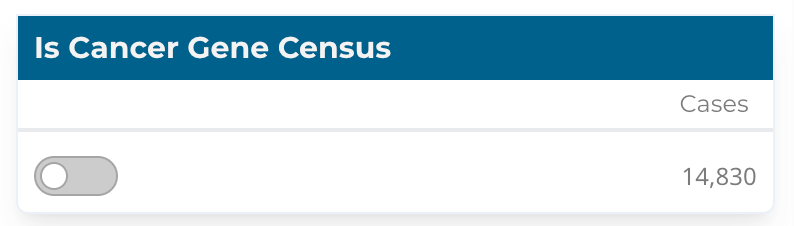
Toggle Facet
The facet components are documented in the GDC Data Portal 2.0 SDK API documentation. As these components are passed data fetcher and filter management hooks, they can be used for both cohort and local filters in an application.
VerticalTable
The VerticalTable component is used to display data in a table format. The VerticalTable component is a Mantine component using React table version 8. The VerticalTable component has a number of parameters, the most important being data, columns, and filters. The data is the data to display in the table, the columns are the columns to display in the table, and is where the fields are rendered. The table has support for searching, sorting, and pagination. It can be configured to render many different types of columns, including text, numeric, and date. The table can also be configured to use React components for rendering columns. The Vertical Table is used for most of the table views in the GDC Data Portal. There are a number of examples of its use and is documented in the GDC Data Portal 2.0 SDK API documentation.
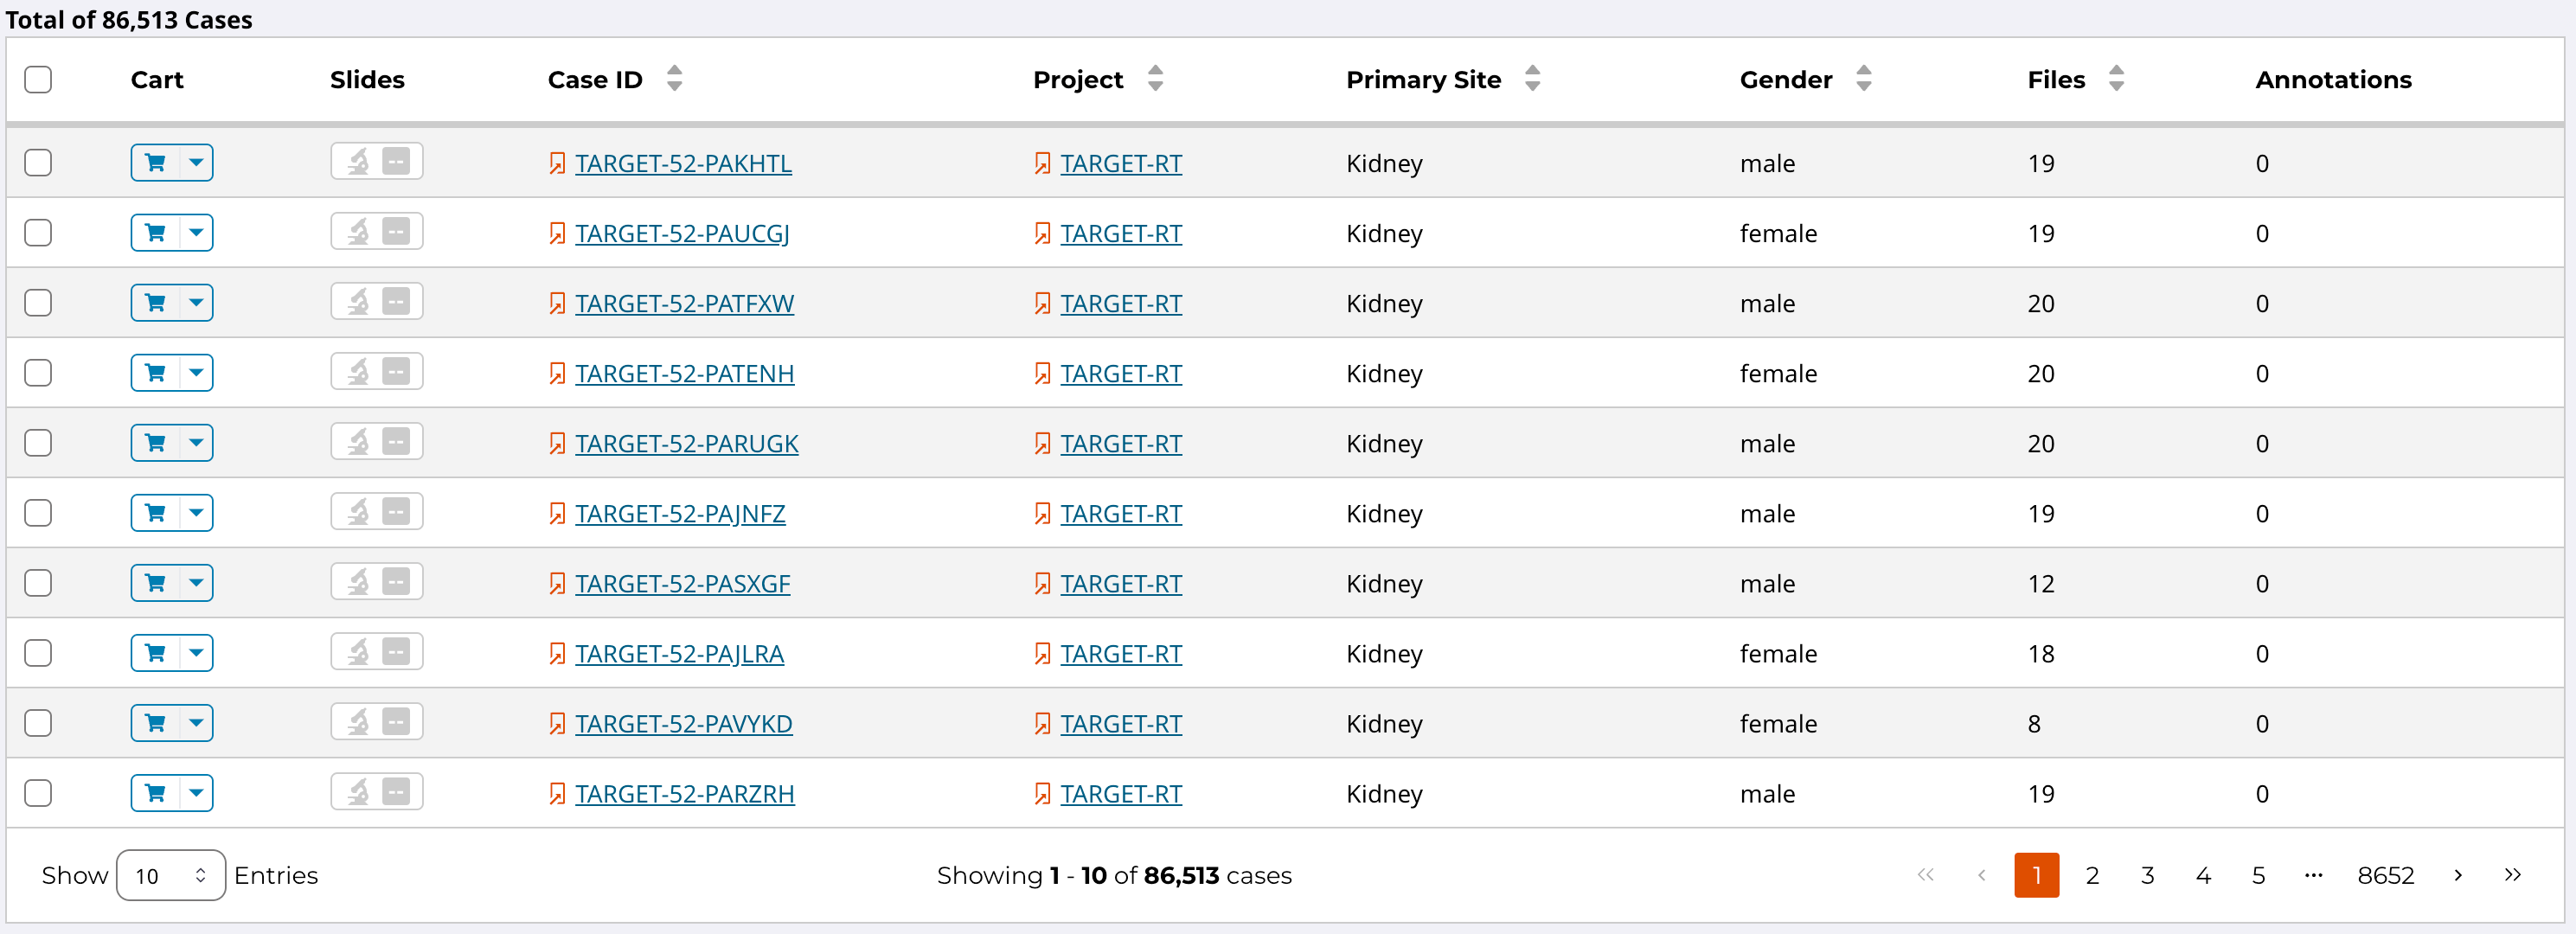 Vertical Table
Style Guide
The GDC Data Portal Style Guide provides a comprehensive reference for creating consistent designs adhering to the Data Portal's visual and accessibility standards. Within the Style Guide, you will find information about our predefined styles, available library of pre-built components, as well as guidelines on best practices for accessibility, responsive design, and usability.
Application Development
Getting Started
The GDC Data Portal 2.0 is a monorepo that contains all the code for the GDC Data Portal. The monorepo is managed using lerna and npm, and contains the following packages:
@gff/core- Contains the core components and hooks for the GDC Data Portal.@gff/portal-proto- Contains the UI components and application framework (using NextJS) for the GDC Data Portal.
Note that in the future, the UI components located in the @gff/portal-proto package will be refactored into a
separate package , and @gff/portal-proto will be renamed to @gff/portal.
Developers can get started by cloning the repo and following the instructions in the README.md file.
Application Layout
A typical application will have the following layout. The main section of the application is the area where components like tables, graphs, and other components are displayed. Local filters are displayed on the left side and depending on the number of facets, will scroll vertically. This is a typical layout but other layouts are possible, like in the case of ProteinPaint. Applications are encouraged to use vertical space as much as possible, as horizontal scrolling can be a poor user experience.
This section will describe parts of the Project application and how it is structured. The Project application is a
simple application that displays a table of projects and allows the user to filter the projects by a number of filters.
As the local filters are selected the table display is updated, but the cohort is not changed (i.e. cohort filters are
not
updated). The Project application's source code is in the @gff/portal-proto package in the src/features/projectsCenter
directory.
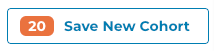
The user can create a new saved cohort by selecting projects and clicking the "Save New Cohort" button. This will open
a modal that will allow the user to name the cohort and save it. The Project application is a good example of how to use
the GDC Data Portal 2.0 SDK to create an application.
 Major Sections of an Application
Local State
Depending on the application, it may be necessary to maintain the local state. For example, in the Projects application, the selected local filters, in this case, represented as Enumeration Facets, are stored in the local state. This allows the application to remember the selected filters when the user navigates away from the page and then returns. Persisting the state uses [Redux Toolkit] and [Redux Persist] to store the state in local storage. While the CoreState is managed by the portal core, the local state is managed by the application. Using a separate store for the local state allows the application to manage the state without having to worry about affecting the core state.
The GDC Data Portal core package provides a number of functions to assist in the creation and persisting of the redux store and will create handlers such as 'AppState', 'AppDispatch', and 'AppSelector'. The 'AppState' is the type of the local state, the AppDispatch is the type of the dispatch function, and the 'AppSelector' is the type of the selector function.
All of these can be automatically created using the createAppStore function:
import {createAppStore} from "@gff/core";
import {projectCenterFiltersReducer} from "./projectCenterFiltersSlice";

const PROJECT_APP_NAME = "ProjectCenter";

// create the store, context and selector for the Project  Center
// Note the project app has a local store and context which isolates
// the filters and other store/cache values

const reducers = combineReducers({
    projectApp: projectCenterFiltersReducer, // An application may have more that one reducer
});

export const {id, AppStore, AppContext, useAppSelector, useAppDispatch} =
    createAppStore({
        reducers: reducers,
        name: PROJECT_APP_NAME,
        version: "0.0.1",
    });

export type AppState = ReturnType<typeof reducers>;
Calling this function will create the local store given the reducers, its name, and version number of the application.
The name of the application is used to create the local storage key for the application. The id is the id of the
application and is used to create the local storage key. The AppStore is the local store, the AppContext is the
local context, the useAppSelector is the selector hook, and the useAppDispatch is the dispatch hook.
Since there is now a local store, developers can create a slice associated with the local state. This is a standard Redux Toolkit slice and will contain the reducer, actions, and selectors for the local state.
Persisting the Local State
If it is desirable to persist the local state, this is done with the persistReducer function from the
redux-persist package. Any reducer can be persisted by creating a
persisted store and passing the reducer to the persistReducer function. For example, the createAppStore function
can be modified to persist the local filter state as:
import {combineReducers} from "redux";
import {persistReducer} from "redux-persist";
import storage from "redux-persist/lib/storage";
import {createAppStore} from "@gff/core";
import {projectCenterFiltersReducer} from "./projectCenterFiltersSlice";

const PROJECT_APP_NAME = "ProjectCenter";

const persistConfig = {
    key: PROJECT_APP_NAME,
    version: 1,
    storage,
    whitelist: ["projectApp"],
};

// create the store, context and selector for the Project Center
// Note the project app has a local store and context which isolates
// the filters and other store/cache values

const reducers = combineReducers({
    projectApp: projectCenterFiltersReducer,
});

export const {id, AppStore, AppContext, useAppSelector, useAppDispatch} =
    createAppStore({
        reducers: persistReducer(persistConfig, reducers),
        name: PROJECT_APP_NAME,
        version: "0.0.1",
    });

export type AppState = ReturnType<typeof reducers>;
For example, the projectCenterFiltersSlice.ts which handles the local filters, is defined as:
import {createSlice, PayloadAction} from "@reduxjs/toolkit";
import {Operation, FilterSet} from "@gff/core";
import {AppState} from "./appApi";

export interface ProjectCenterFiltersState {
    readonly filters: FilterSet;
}

const initialState: ProjectCenterFiltersState = {
    filters: {mode: "and", root: {}},
};

const slice = createSlice({
    name: "projectCenter/filters",
    initialState,
    reducers: {
        updateProjectFilter: (
            state,
            action: PayloadAction<{ field: string; operation: Operation }>,
        ) => {
            return {
                ...state,
                filters: {
                    mode: "and",
                    root: {
                        ...state.filters.root,
                        [action.payload.field]: action.payload.operation,
                    },
                },
            };
        },
        removeProjectFilter: (state, action: PayloadAction<string>) => {
            // eslint-disable-next-line @typescript-eslint/no-unused-vars
            const {[action.payload]: _, ...updated} = state.filters.root;
            return {
                ...state,
                filters: {
                    mode: "and",
                    root: updated,
                },
            };
        },
        clearProjectFilters: () => {
            return {filters: {mode: "and", root: {}}};
        },
    },
    extraReducers: {},
});

export const projectCenterFiltersReducer = slice.reducer;
export const {updateProjectFilter, removeProjectFilter, clearProjectFilters} =
    slice.actions;

export const selectFilters = (state: AppState): FilterSet | undefined =>
    state.projectApp.filters;

export const selectProjectFiltersByName = (
    state: AppState,
    name: string,
): Operation | undefined => {
    return state.projectApp.filters.root[name];
};
The above code creates a slice for the local state. The slice contains the reducer and the actions for the local state.
The reducer is projectCenterFiltersReducer and the actions are updateProjectFilter, removeProjectFilter,
and clearProjectFilters.
The selectors are selectFilters and selectProjectFiltersByName. The selectFilters selector returns the filters for
the
application, while the selectProjectFiltersByName selector returns the filter for a given name.
Application Hooks
The above can be used to define hooks for use in the local filter EnumFacet component. For example,
the useProjectFiltersByName hook is
implemented as:
export const useUpdateProjectsFacetFilter = (): UpdateFacetFilterFunction => {
    const dispatch = useAppDispatch();
    // update the filter for this facet

    return (field: string, operation: Operation) => {
        dispatch(updateProjectFilter({field: field, operation: operation}));
    };
};
Clearing the local filters is done using the clearProjectFilters action:
export const useClearProjectsFacetFilters = (): ClearFacetFiltersFunction => {
    const dispatch = useAppDispatch();
    // clear the filters for this facet

    return () => {
        dispatch(clearProjectFilters());
    };
};
Note that the dispatch function is the useAppDispatch hook returned by the createAppStore function. The
user-selected local filters can be retrieved using the useProjectsFilters hook created by combining the
useAppSelector hook and the selectFilters selector:
export const useProjectsFilters = (): FilterSet => {
    return useAppSelector((state) => selectFilters(state));
};
Creating a New Cohort
The Project application allows users to create a new cohort from the selected projects. The cohort is created using the
SaveCohortModal component. The SaveCohortModal component passes the current cohort filters and the local project
filters to create a new saved cohort. In the case of the Project application, the SaveCohortModal component is used
in a button component. The button component is passed the selected projects and the SaveCohortModal component is
rendered when the button is clicked. The SaveCohortModal component passes the current cohort filters and the local
project filters to create a new saved cohort. The SaveCohortModal component is used in the Project application as:
import React, {useState} from "react";
import {Button, Tooltip} from "@mantine/core";
import {CountsIcon} from "@/components/tailwindComponents";
import SaveCohortModal from "@/components/Modals/SaveCohortModal";

const ProjectsCohortButton = ({pickedProjects,}: { pickedProjects: string[]; }): JSX.Element => {
    const [showSaveCohort, setShowSaveCohort] = useState(false);

    return (
        <>
            <Tooltip
                label="Save a new cohort of cases in selected project(s)"
                withArrow
            >
        <span>
          <Button
              data-testid="button-create-new-cohort-projects-table"
              variant="outline"
              color="primary"
              disabled={pickedProjects.length == 0}
              leftIcon={
                  pickedProjects.length ? (
                      <CountsIcon $count={pickedProjects.length}>
                          {pickedProjects.length}{" "}
                      </CountsIcon>
                  ) : null
              }
              onClick={() => setShowSaveCohort(true)}
              className="border-primary data-disabled:opacity-50 data-disabled:bg-base-max data-disabled:text-primary"
          >
            Save New Cohort
          </Button>
        </span>
            </Tooltip>
            {showSaveCohort && (
                <SaveCohortModal
                    onClose={() => setShowSaveCohort(false)}
                    filters={{
                        mode: "and",
                        root: {
                            "cases.project.project_id": {
                                operator: "includes",
                                field: "cases.project.project_id",
                                operands: pickedProjects,
                            },
                        },
                    }}
                />
            )}
        </>
    );
};

export default ProjectsCohortButton;
This custom button component uses the state variable showSaveCohort to determine if the SaveCohortModal component
needs to be shown.
The SaveCohortModal component is passed to the current list of projects selected by the user and handles the creation of
the cohort and saving it.
Application Demo
In addition to the actual application, it can have a demo. The demo can be used to show the
application's functionality and is shown when the demo button is clicked. The demo button is shown when the
application is registered with hasDemo: true, as described in
the Application Registration section.
The application can determine if the demo button should be shown by using the useHasDemo hook. The useHasDemo hook
returns a boolean indicating if the demo button should be shown. The demo button can be shown using the following code:
import {useIsDemoApp} from "@/hooks/useIsDemoApp";

const GenesAndMutationFrequencyAnalysisTool: React.FC = () => {
    const isDemoMode = useIsDemoApp();
...
Application Registration
An application needs to be "registered" to be used in the GDC Data Portal. Registration is done by adding the application
using createGdcAppWithOwnStorefunction. If the app is not using its store, then the createGdcApp function can be
used.
import {createGdcAppWithOwnStore} from "@gff/core";
import {AppContext, AppStore, id} from "@/features/projectsCenter/appApi";
import {ProjectsCenter} from "@/features/projectsCenter/ProjectsCenter";

export default createGdcAppWithOwnStore({
    App: ProjectsCenter,
    id: id,
    name: "Projects Center",
    version: "v1.0.0",
    requiredEntityTypes: [],
    store: AppStore,
    context: AppContext,
});

export const ProjectsCenterAppId: string = id;
The above code registers the application with the GDC Data Portal. The createGdcAppWithOwnStore function takes a number of
arguments:
App: React.ComponentType - The application componentid: string - The id of the applicationname: string - The name of the applicationversion: string - The version of the applicationrequiredEntityTypes: string[] - The required entity types for the applicationstore: Store - The store for the applicationcontext: Context - The context for the application
The required entity types are the data types that the application requires to function. For example, the Mutation
Frequency application
requires the ssms entity type. While this value is not currently used, it will be in the future to determine if
the application has the data it needs to run.
The other registration needed for the application is in packages/portal-proto/src/features/user-flow/workflow/registeredApps.tsx This file contains an array of registered applications. For example the entry for the Project Center is:
import ProjectsIcon from "public/user-flow/icons/crowd-of-users.svg";

...
{
    name: "Projects",
        icon: (<ProjectsIcon
            width={64}
            height={64}
            viewBox="0 -20 128 128"
            role="img"
            aria-label="Projects icon" />),
        tags: [],
        hasDemo: false,
        id: "Projects",
        countsField: "caseCount",
        description: "View the Projects available within the GDC and select them for further exploration and analysis.",
}
...
The above code registers the Project Center application with the GDC Data Portal. The members of the object are:
nameThe name of the applicationiconThe icon as an SVG file, its size and position can be adjusted using thewidth,height, andviewBoxpropertiestagsThe tags for the application used for searching (which is not currently active)hasDemoA boolean indicating if the application has a demo. If so, the demo button will be shown.idThe id of the application, which needs to match the id of the application registered in thecreateGdcAppWithOwnStorefunctioncountsFieldThe field to use for the counts in the application. This is used to determine if the application can be used.descriptionThe description of the applicationnoDataTooltipThe tooltip to show if the application has no data
When the application is registered, it will be available in the GDC Data Portal. The application can be accessed by clicking on the application card. The visual elements of the card are:
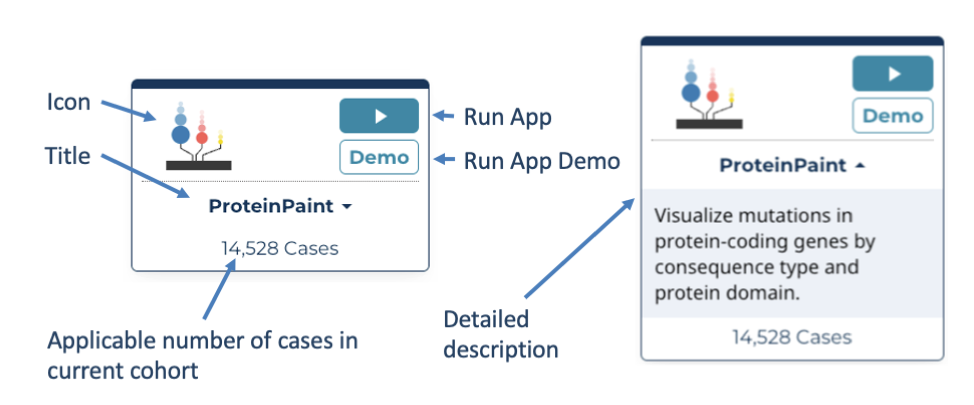
Application Card and Associated Elements
Source Code Layout
While developers have freedom in structuring application code, the following is a recommended layout for an application's source code:
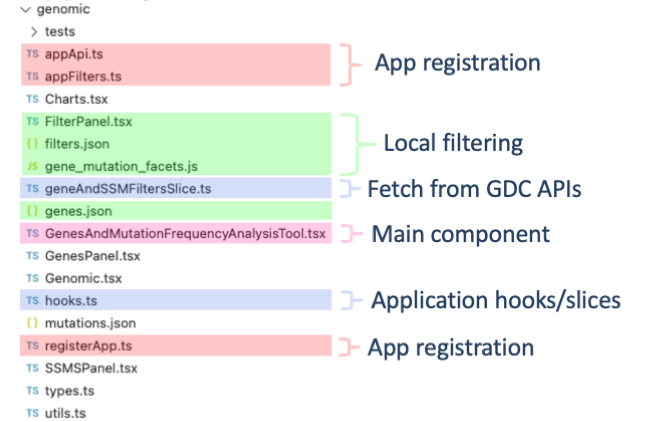
Application Source Code Layout
Appendix
Using Selectors and Hooks
Although a complete guide to React hooks and selectors is out of the scope of this document, a brief overview of how to use them for application development is provided. For more information on hooks and selectors please see the React Hooks documentation. As the GDC uses the Redux-toolkit, calls described in the Redux Toolkit documentation are used as examples.
Selectors
Selectors are used to access the state of the GDC Data Portal's main redux store. Using selectors is the preferred method for accessing the state of the GDC Data Portal. Selectors are functions that take the state as an argument and return a value.
import {useCoreSelector, selectCurrentCohort} from '@gff/core';

const currentCohort = useSelector(selectCurrentCohort);
The selector will return the current value of the item in the store. Consult the GDC 2.0 API documentation for a complete list of selectors.
Hooks
Fetching data from the GDC API is done via hooks. Hooks are functions that take arguments and return a value. The value
returned is typically a promise that resolves to the data requested. The GDC Data Portal provides a number of hooks for
fetching data from the GDC 2.0 API. These hooks are located in the @gff/core package.
import {useGeneSymbol} from '@gff/core';

const {data: geneSymbolDict, isSuccess} = useGeneSymbol(
    field === "genes.gene_id" ? facetValues.map((x) => x.toString()) : [],
);
GDC Data Portal hooks are designed to work similarly to the RTL Query hooks. The hooks take arguments and return an object,
which contains the data and the status of the query. The status of the query is stored in the isSuccess variable.
The data returned from the query is stored in the data variable. The object returned from a GDC hook is of the form:
{
    data: any;
    isSuccess: boolean;
    isLoading: boolean;
    isError: boolean;
    error: Error;
}
where data is the data returned from the query, isSuccess is a boolean indicating if the query was
successful, isLoading
is a boolean indicating if the query is currently loading, isError is a boolean indicating if the query resulted in an
error, and error is the error returned from the query.
Querying the GDC API Directly
There may be cases where there is a need to query the GDC API directly. The GDC Data Portal provides a number of functions for
querying the GDC API. These functions are located in the @gff/core package and include:
fetchGdcProjects- Fetches project datafetchGdcAnnotations- Fetches annotation datafetchGdcSsms- Fetches ssms datafetchGdcCases- Fetches cases datafetchGdcFiles- Fetches files data
The functions are wrappers around fetchGdcEntities function. The fetchGdcEntities function takes a number of arguments:
export interface GdcApiRequest {
    readonly filters?: GqlOperation;
    readonly case_filters?: GqlOperation;
    readonly fields?: ReadonlyArray<string>;
    readonly expand?: ReadonlyArray<string>;
    readonly format?: "JSON" | "TSV" | "XML";
    readonly size?: number;
    readonly from?: number;
    readonly sortBy?: ReadonlyArray<SortBy>;
    readonly facets?: ReadonlyArray<string>;
}
There is also support for the GraphQL API. The fetchGdcGraphQL function takes two arguments:
export const graphqlAPI = async <T>(
    query: string,
    variables: Record<string, unknown>,
): Promise<GraphQLApiResponse<T>> => ...
where query is the GraphQL query and variables are the variables for the query.
API Documentation
To access the Developers documentation for the GDC API, use the following commands in your terminal:
git clone git@github.com:NCI-GDC/gdc-frontend-framework.git
cd gdc-frontend-framework/
git checkout feat/with_api_docs
Next, within the repo, open docs/api/index.html in your browser.